Junipeer supports integrations with a range of payment service providers (PSPs), including Svea, Mollie, Adyen, Qliro, Klarna, and others. While each PSP has its own connector guide, the setup process follows the same universal pattern described here.
Step 1 — Obtain your PSP API credentials
Contact your PSP's support or access their merchant portal to generate API credentials. Depending on the provider, you may receive:
A single API key
Separate keys per market or payment method
OAuth-based access (handled directly in Junipeer)
For Svea specifically: you need your Merchant ID and Secret. If you don't have these, contact your Svea agent and ask specifically for those two values.
If you receive multiple credential sets (e.g. for different markets), Junipeer can handle multiple configurations for the same PSP. Refer to the specific connector guide for your provider.
Step 2 — Decide which flows to enable
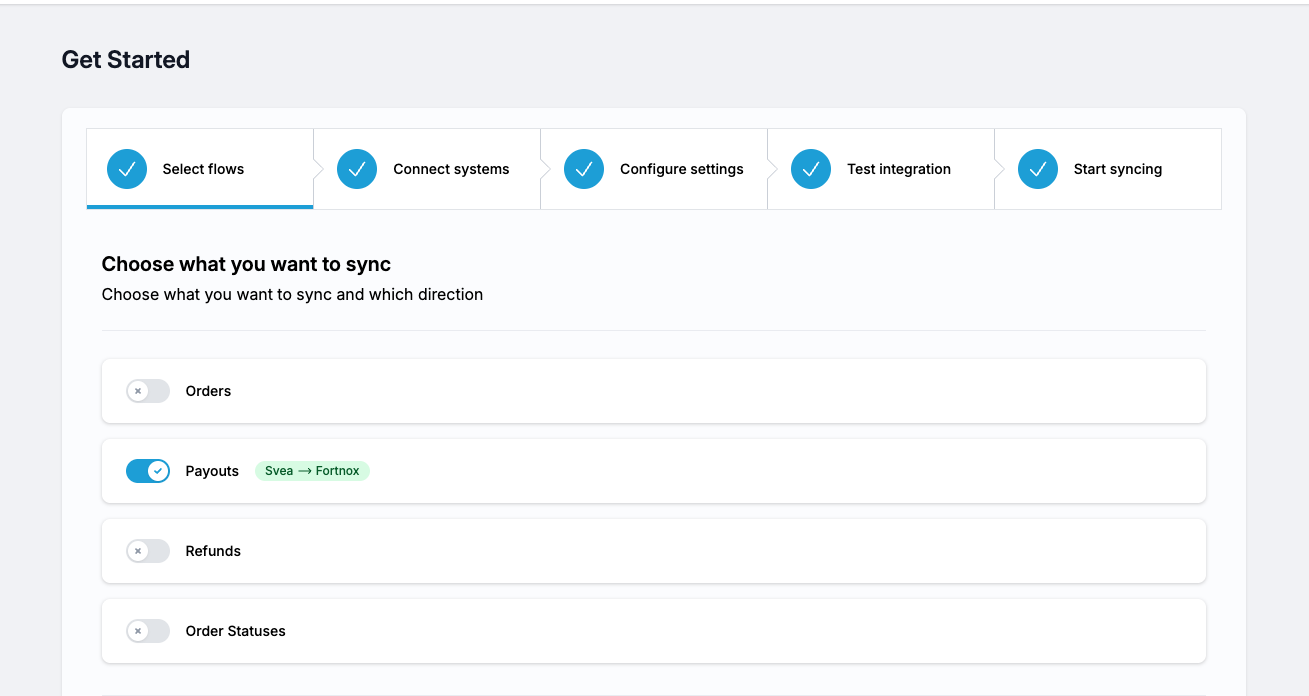
In the Junipeer app (app.junipeer.io), navigate to Get Started → Select Flows.
This is the most important decision in a PSP integration, and it depends on your overall tech stack.
Common PSP flows in Junipeer:
Orders — syncs order data from the PSP into your accounting system
Invoices — creates invoices at delivery
Refunds — creates credit invoices when refunds occur in the PSP
Payouts — reconciles PSP settlement payouts against invoices in your accounting system
If you are using an e-commerce connector (e.g. Shopify, Centra, WooCommerce) alongside a PSP connector, do not enable the Orders flow in the PSP integration. Orders will already be flowing into your accounting system via the e-commerce connector. Enabling orders in both will result in duplicates. In this case, limit the PSP integration to Payouts (and optionally Refunds).
When in doubt, discuss with your Junipeer onboarding contact before enabling flows.
Step 3 — Connect your systems
In the Junipeer app, navigate to Get Started → Connect Systems. Connect both your PSP and your accounting system. For example:
Fortnox — click the Fortnox button and authorize via OAuth. Once connected, you'll see a green checkmark.
Your PSP — enter your credentials (e.g. Merchant ID and Secret for Svea). Once both systems show a green checkmark, you're ready to configure.
Make sure your accounting system is correctly prepared before connecting. See Prepare Fortnox for integration for the required steps for this ERP specifically.
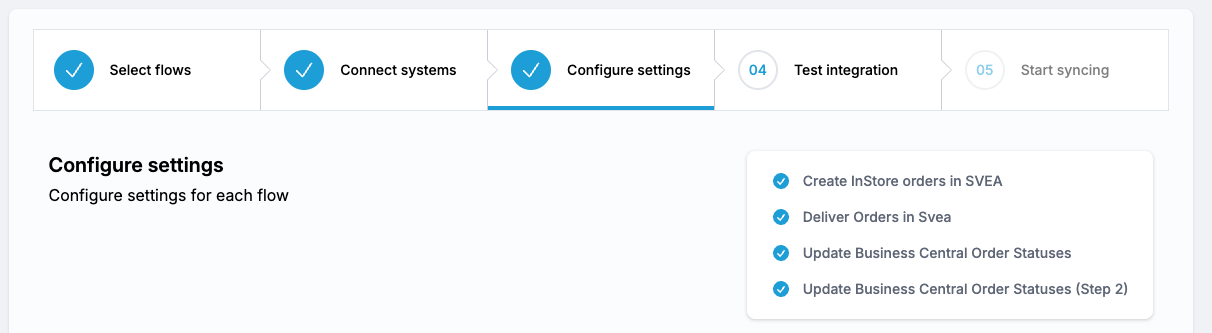
Step 4 — Configure settings
Navigate to Configure → Settings. There is quite a bit here — the objective is to configure every flow enabled in Step 2:
(This is just an example)
1. Required settings
Any setting labeled "This setting is required and must be saved" is mandatory. Consider them above miscellaneous options.
2. Order number mapping
Only relevant if you have the Orders flow enabled. Skip this if you are running a payout-only integration.
This maps PSP order numbers to your accounting system for traceability. This setting requires the ERP to be connected first.
This might not be necessary, dependent on the ERP.
Default pattern for Shopify:
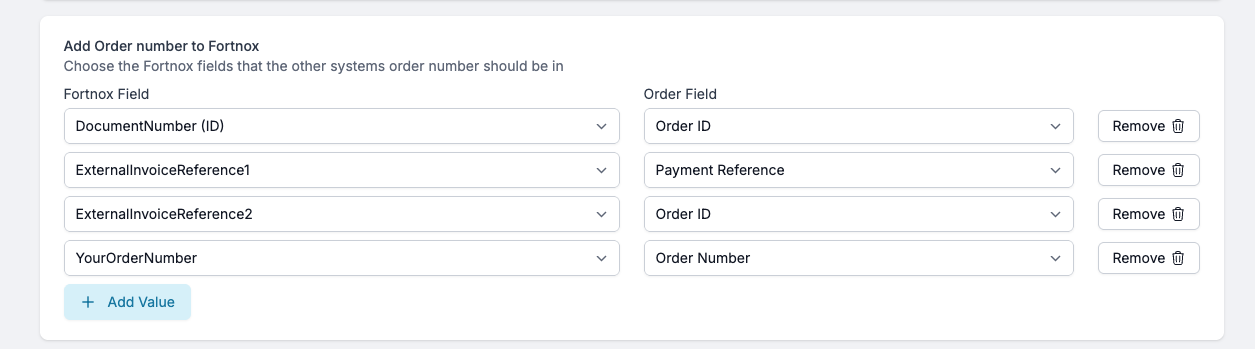

If you're unsure about this setup, your Junipeer onboarding contact can help you out.
3. OSS / sales account mapping
Only relevant if you have the Orders flow enabled. Skip this if you are running a payout-only integration — payout reconciliation does not require sales account mapping.
Map your sales accounts to countries under Configure → Settings → Sales Account mapping & OSS VAT.
Refer to the separate OSS setup guide.
This mapping is required even if you only sell in Sweden. You need at least one entry: your Swedish sales account mapped to Sweden as a country. To add it, go to the OSS settings, click Add, select Sweden as the country, and enter the corresponding account number from your accounting system. If you're unsure which account to use, check with your accountant — it's typically your standard Swedish VAT sales account.
4. Settlement (payout) account mapping
Map your PSP's payment methods to your accounting system account numbers under Configure → Settings → Booking Accounting / Settlements.
You will need:
The account number used for PSP payouts (your bank account or interim account)
Account numbers for bank costs and outgoing tax

This step is essential — without it, payouts won't book correctly in your accounting system. If you're unsure of the account numbers, your accountant will know.
Step 5 — Test the integration
This step is highly dependant on the flows that you have enabled in Step 2.
PSPs typically identify orders by a Checkout ID or Order ID (the exact term varies by provider). Use one or more of these IDs in the Junipeer test panel to verify:
Order or invoice creation in your accounting system
Refund and credit invoice matching
Payouts are usually not eligible for testing. The schedule/webhook has to run on production and the merchant should monitor the results after every sync.
Testing is optional but strongly recommended before going live.
Step 6 — Activate via scheduling/webhooks
Important: Some PSP integrations go live through webhook activation, not the Start syncing button.
Webhooks allow your PSP to push events (new orders, refunds, payouts) to Junipeer in real time. To activate:
Navigate to the webhook settings in the Junipeer app for your PSP connector
Enable the webhook


Configure the payout sync schedule — typically set to run at 23:00 so that daily settlements are processed overnight

Once webhooks/scheduling is active, Junipeer will process incoming events automatically.
Contact your Junipeer onboarding contact when you've completed configuration — they will review your setup, confirm the order number mapping, and guide you through activating the webhooks.
Retroactive sync
If you need to sync historical orders that predate your go-live, you can enter their PSP Checkout IDs (or equivalent order identifiers) manually in the Junipeer app.
How PSP integrations work
Once live, a typical PSP integration processes data in this sequence:
Order created in PSP → Junipeer creates a corresponding order record in your accounting system
Delivery confirmed → An invoice is automatically generated
Refund issued in PSP → A credit invoice is created and linked to the original invoice
Payout received → Each payout line is matched to invoices or credit invoices, and any PSP fees are written off for accurate reconciliation
Additional info is available HERE
FAQ
Is the payout reported to the actual bank account?
We don't handle this part. We connect settlements to invoices using the configured Sales Accounts. After this, it's the accounting that has to match the actual settlement quota with the bank. Fortnox has a bank integration, so it can be automated in their platform. Or it can be done manually on your end. But this is not a part of our integration.
Can I use Junipeer to export payouts only, without sending the order data?
In case of external services being responsible for handling the order data, we can't guarantee that the payout flow will work as planned. If your e-commerce is not integrated via Junipeer and/or orders and invoices in Fortnox are currently created by another third-party tool, the end result of an attempt to match a payout with the ID stored on the invoice is unpredictable.
Why? When an invoice has not gone through Junipeer, it lacks the PSP's order/checkout ID as a reference, and then we cannot automatically match PSP's payment or return against the correct invoice in Fortnox.
For provider-specific instructions, refer to the connector guide for your PSP. If you have questions during setup, contact support@junipeer.io.